
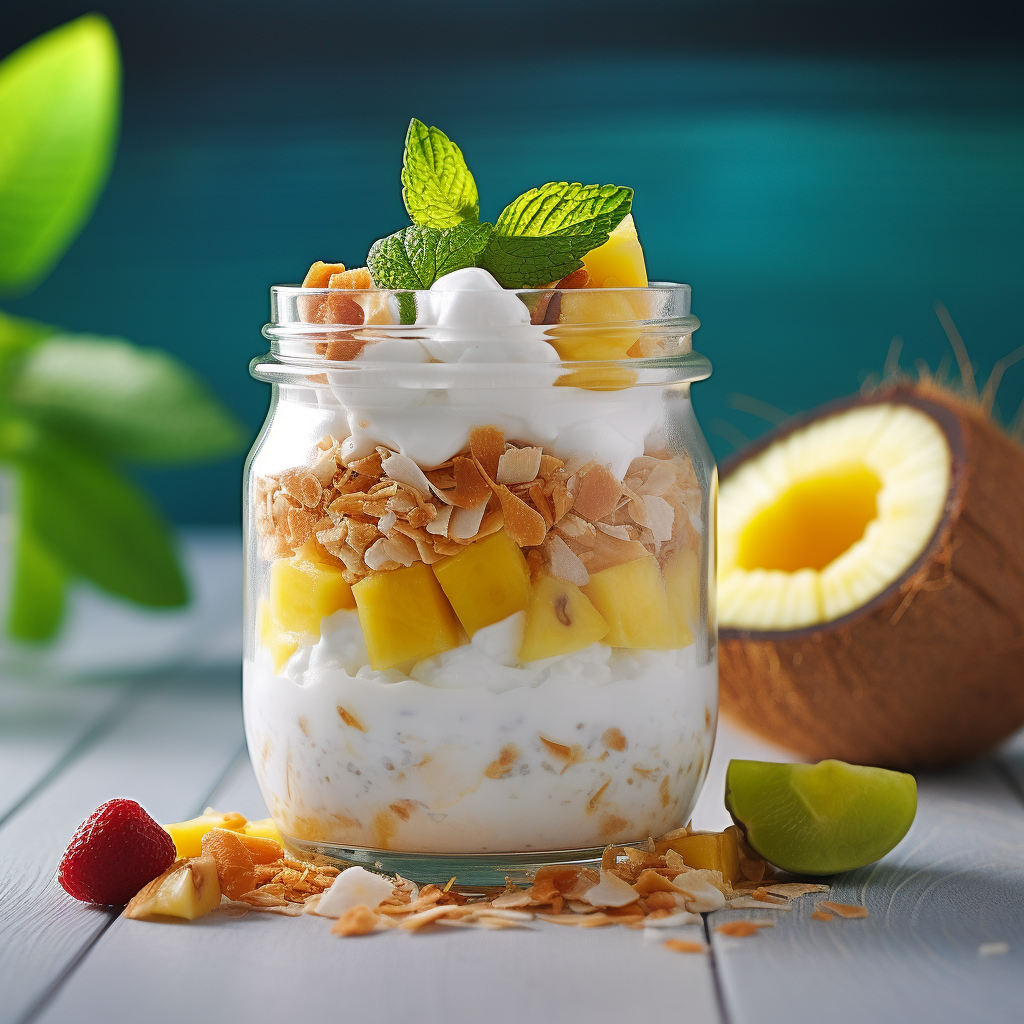
 So where on earth have I been? Well, I can tell you a lot has happened these last 6 years. I won't bore you with all the details (6 years is quite a lot to catch up on), but I did want to share some exciting updates that not only have been significant for me but may be helpful for you too. I know I still get a decent amount of traffic to this blog and I appreciate all the comments and feedback I receive. I know that most of you passing through here are struggling with some form of food intolerance, sensitivities, or autoimmune issues. I started this page initially to share my experiences with these conditions, and to provide recipes (and a friendly ear) to anyone in the same boat. I know a lot of you have been in the same position, and many are still struggling with food intolerances, particularly when it comes to reintroducing foods. I can confirm that the diets I cover on this site have 100% helped to alleviate my symptoms and take away a lot of distress - emotionally and physically. But I, like many of you, hit a wall and my progress stalled. I felt so much better until it came to reintroductions. And I failed at them over, and over again. I spent the last several years trying to dig deeper into this, trying to uncover the 'why?' and kept hitting a wall. I tried MORE diets and MORE supplements, all to no avail. Until someone mentioned the nervous system. And in that moment, everything became so clear. It wasn't about the food. It wasn't that I needed more probiotics, more gut healing protocols, or more detoxes. I realized my nervous system was dysregulated. And to be honest, pretty badly dysregulated. I've spent the last year working on protocols to regulate my nervous system and it has literally changed my life. I feel like an entirely different person, I am able to better respond to stressors, I recover more quickly from setbacks and flare-ups, but most excitingly, I've successfully reintroduced so much food. I've gone from someone who couldn't even introduce fruit, to being able to periodically eat dairy-based ice cream, cheese-laden nachos, and high-histamine foods. All because I worked on my nervous system. So how do you work on your nervous system? That's why I'm here. My husband and I have seen such amazing results from practicing nervous system regulation, that we are building a website that aims to provide all the tools, resources, info, and practices you need to start regulating your nervous system. Including suggesting all our favorite practitioners and protocols. Now, it's early days and we are adding new content daily, but we want to share it with you now, so you can explore the possibility of nervous system regulation as part of your own healing journey. You can find us here: Learn How to Regulate Your Nervous System | RegulateCo And I recommend getting started with some of our articles: RegulateCo Blog | RegulateCo And of course...there are recipes! Recipes Archives | RegulateCo. You can find the one in the header photo here: Easy Paleo Coconut Yogurt Parfait | RegulateCo. As I said, it's a work in progress, but we are adding content all the time, and we'd love to see you over there. In the meantime, if you have any questions, you can still email me at [email protected] We look forward to having you come co-regulate with us!
0 Comments
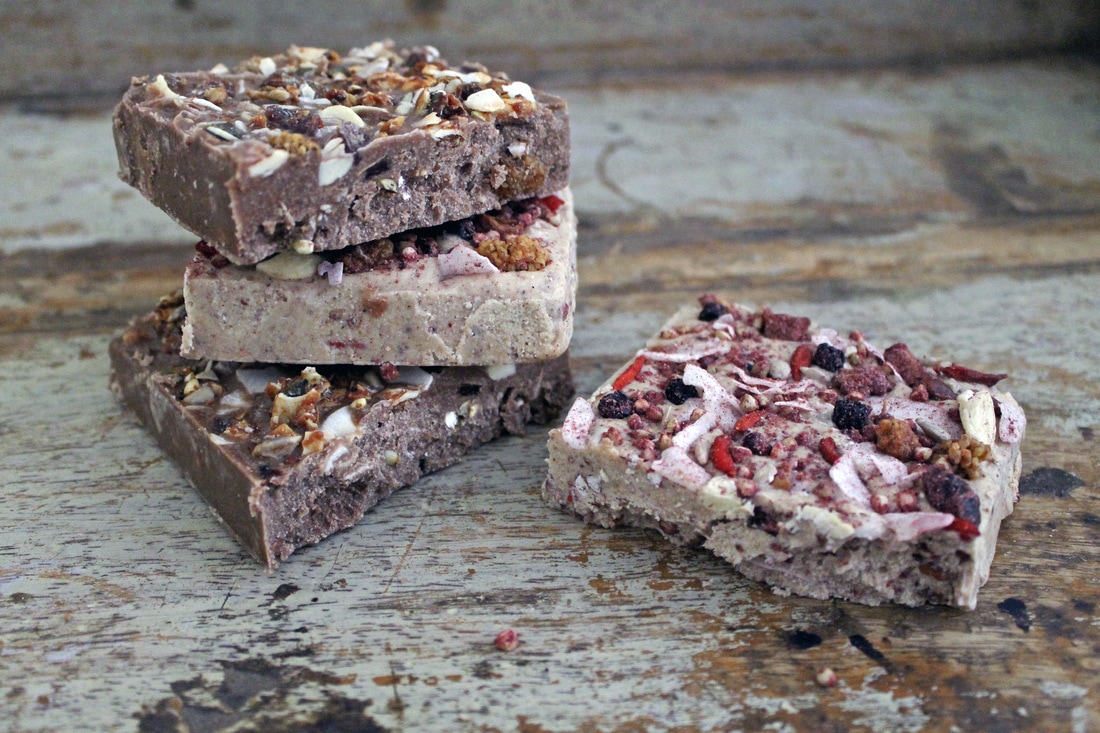 Granola fudge (Paleo, gluten free, dairy free with AIP and low FODMAP options) This granola fudge was my Easter weekend treat. It took all of 5 minutes to throw together 1 hour to set and about 45 seconds to devour. It is sweet, rich, creamy and totally delicious - not to mention versatile. I used 2 different granolas from Lucy Rocks to fill and top each bar of fudge. Both granolas are not only paleo perfect but also utterly scrummy. I have listed below recipes for Paleo, AIP and low FODMAP variations of the fudge. All recipes make 1 block of fudge as pictured but you could divide your mixture between different moulds. You will need: A food processor Baking paper A small dish or mould - I used a baking dish measuring 3 x 6.5 inches Ingredients for blush crunch granola fudge: 3/4 cup tiger nut powder 1/2 tablespoon of almond butter (my favourite is meridian) 2 tablespoons of coconut oil (my favourite is lucy bee) plus half a cup of melted coconut oil 1 teaspoon of maple syrup A pinch of sea salt 1/2 cup of Lucy Rocks Blush Crunch Granola (plus extra for decoration) Method: Line your dish or mould with baking paper and set to one side. Add the tiger nut powder, almond butter and 2 tablespoons of coconut oil to a food processor and blend until a smooth paste forms. This will look like a thick nut butter. Add to this the salt, maple syrup and melted coconut oil. Blend again thoroughly until you have a smooth consistency. Transfer the liquid to a bowl and stir in 1/2 a cup of granola - combine thoroughly so that the granola pieces are evenly distributed throughout the fudge. Pour the fudge mixture evenly into your mould/dish. You can then decorate the top of the fudge by sprinkling more granola over the surface. Place in the fridge for an hour to set. Remove, admire, demolish. Ingredients for golden granola fudge: 3/4 cup of tiger nut powder 1 tablespoon of carob powder (can sub for chocolate) 2 tablespoons of coconut oil plus half a cup of melted coconut oil 1 teaspoon of maple syrup A pinch of sea salt 1/2 a cup of Lucy Rocks Golden Granola (plus extra for decoration) Method: Add the tiger nut powder, carob powder and 2 tablespoons of coconut oil to the food processor. Blend thoroughly to create a smooth paste the consistency of nut butter. Add the salt, maple syrup and melted coconut oil to the paste and blend again until smooth. Transfer this mixture into a bowl and stir through 1/2 a cup of golden granola, ensuring it is spread evenly throughout the fudge. Pour this mixture evenly into your lined mould/dish. Sprinkle additional granola over the surface to decorate and refrigerate for an hour until set. Ingredients for AIP, low FODMAP fudge: 1 cup of tiger nut powder 2 tablespoons of coconut oil plus half a cup of melted coconut oil A pinch of sea salt A teaspoon of maple syrup 1/2 cup of freeze dried strawberries (plus extra for decoration) * If you can tolerate it adding a tablespoon of almond butter makes the fudge even more creamy! Method: Add the tiger nut powder (almond butter if you can tolerate) and coconut oil to the food processor and blend until it forms a smooth paste. Add the salt, maple syrup and melted coconut oil and blend again to form a smooth consistency. Transfer the mixture to a bowl and stir in the freeze dried strawberries, ensuring that they are evenly spread throughout the fudge. Evenly pour the fudge mixture into your lined mould and place in the fridge for an hour until completely set. Each bar of fudge will keep in the fridge for up to 4 days....if it lasts the long. 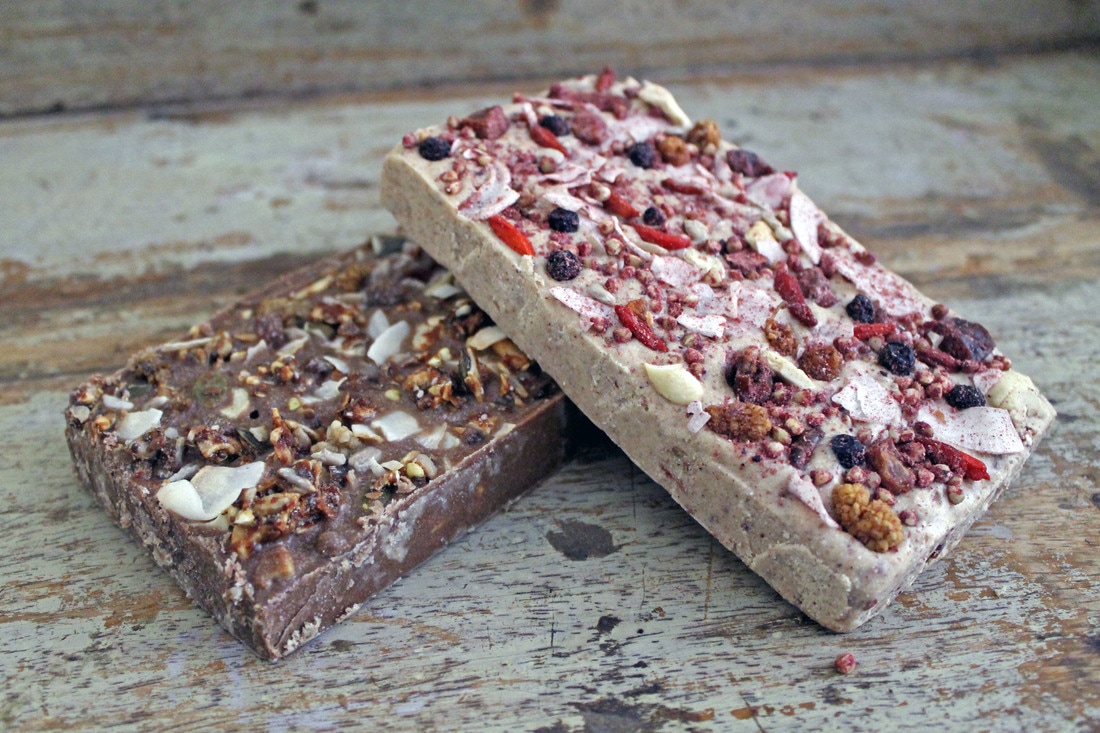 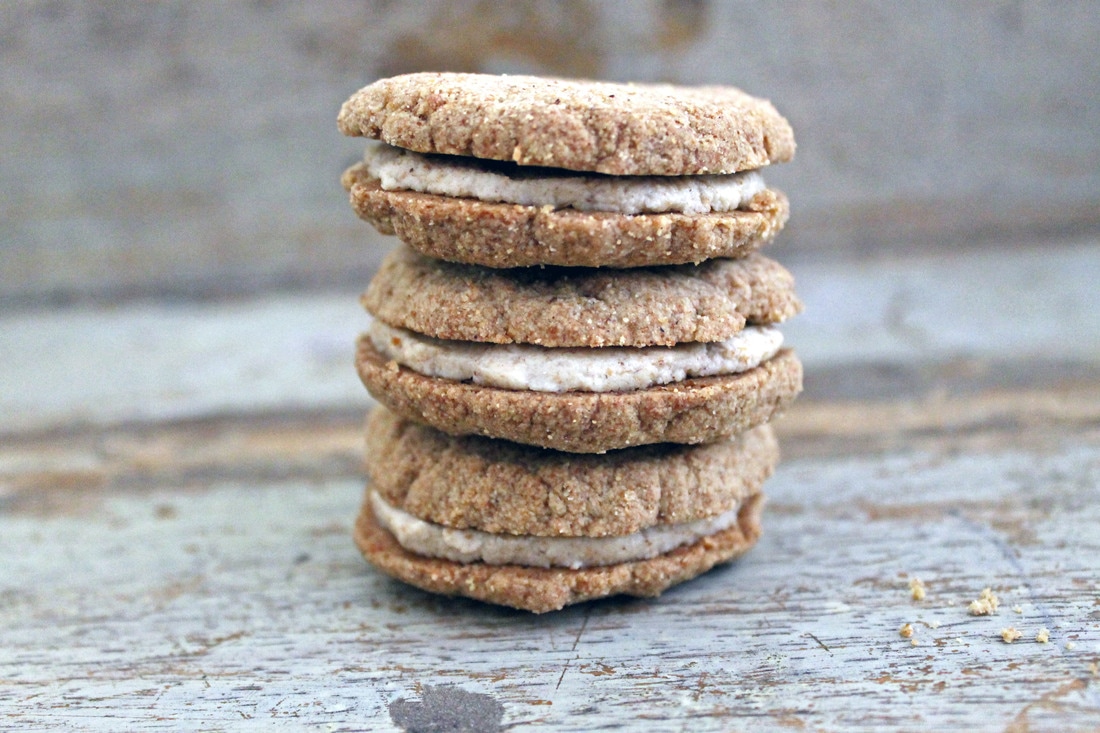 Whoopie pies (AIP, low FODMAP, Paleo, gluten free, dairy free, nut free) When I set about making these, I had absolutely no idea what I intended to create. As the story goes, I was lying in bed one Saturday morning and decided I fancied a cookie. Better still, multiple cookies. It then occurred to me that these cookies should probably be sandwiched together with some kind of creamy filling. This was all the motivation I needed to leave the bed and hit the kitchen. With a few adaptations to one of my previous biscuit recipes, these delicious tiger nut whoopie pies were born. 'Whoopie what?' I hear you cry. A whoopie pie is a kind of cakey cookie. Not crunchy, but soft and chewy and sandwiched with a scrumptious filling. If you haven't tried one, your world is about to change. Makes 15 whoopie pies Ingredients: For the cookies 2 level cups of tiger nut powder 2/3 of a cup of arrowroot powder 1 level teaspoon of bicarbonate of soda A pinch of salt Just shy of 1 cup of melted coconut oil 4 dessert spoons of maple syrup 2 level tablespoons of gelatin powder. 3 dessert spoons of ground ginger 1 heaped teaspoon of cinnamon For the filling 1 cup of sifted tiger nut powder 2 tablespoons of coconut oil 1/4 cup of tiger nut milk Method: To make the cookies Pre heat your oven to 200 degrees or 180 for fan assisted. Line a baking tray with a sheet of baking parchment. Start by adding all the dry ingredients in a mixing bowl and thoroughly combine. In a separate bowl add the maple syrup to the melted coconut oil and stir to combine. Sprinkle the gelatin powder over the surface of the liquid and whisk immediately to ensure thoroughly combined with the liquids, you do not want clumps of gelatin! Pour the liquids into your dry mix and fold together. Fold slowly in a figure of eight whilst turning the bowl to ensure everything is completely combined until a dough forms. Use your hands to form small balls of dough, slightly smaller than a golf ball. Place these onto the baking sheet and use your hands to press them into biscuit shapes. They will spread slightly when cooking so leave some space between each biscuit. Put these in the middle of your oven and bake for 15-17 minutes. After this time they will be starting to turn golden brown. Remove from the oven and leave to cool and firm up. While the cookies are cooling you can make the filling. Add the powder and coconut oil to a blender and blitz until it forms a silky smooth nut butter. Add the milk and blend again until combined. Transfer this mixture to a bowl and leave to one side to firm up a little. Once the cookies are completely cool, spoon a little (or a lot) of the filling into the centre of one cookie and spread to the edges in an even layer. Sandwich with another cookie and voila! The perfect AIP whoopie pie. These will keep in an airtight container for up to 3 days. 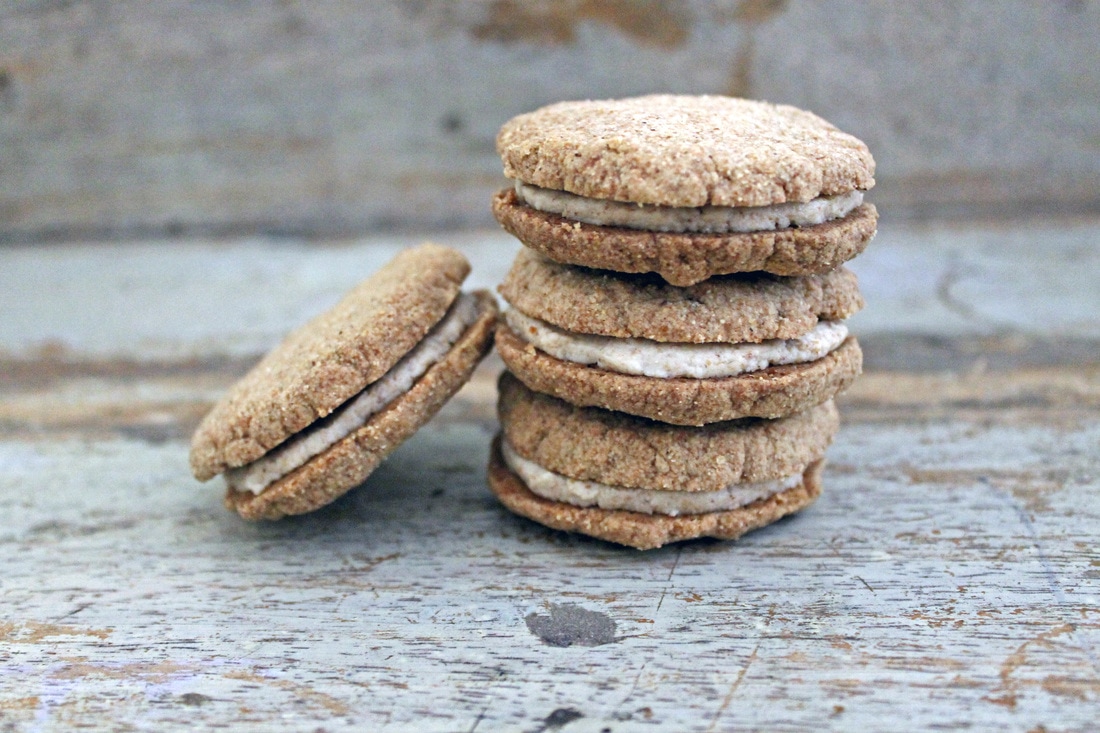 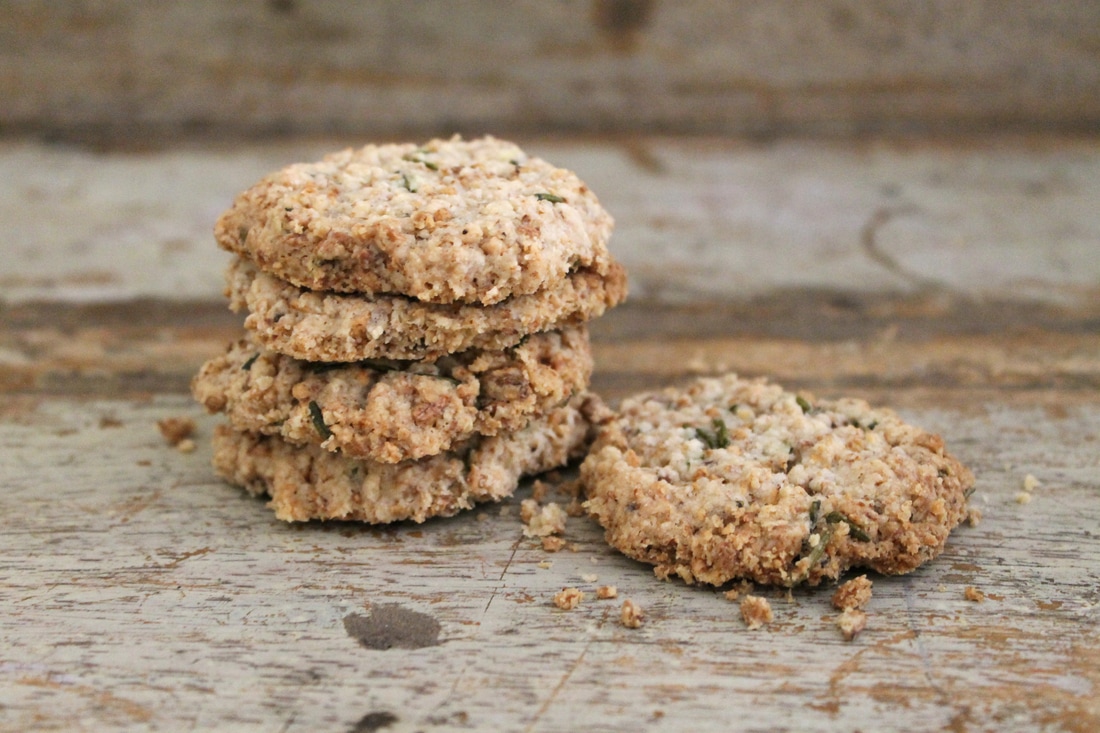 Rosemary biscuits (AIP, low FODMAP, Paleo, Gluten free, dairy free) Having mastered the art of the sweet AIP biscuit, I thought it was time to turn my hand to the savoury variety. I was never much a fan of biscuits with cheese and I am offended by those bone dry crackers that people seem to enjoy slathered in margarine. However, post coeliac diagnosis I discovered the humble oat biscuit and my savoury biscuit world changed forever. The real kick in the teeth then came when I discovered I was also intolerant to oats. Never one to shy away from a bizarre culinary challenge, I decided I would make my own oats. Without oats. Bare with me please, I haven't lost my mind. If you follow my blog you will have noticed that there is very little that you cannot do with a tigernut. With this in mind, I set about creating my own tigernut oats. The result is a buttery, crumbly, slightly sweet yet savoury biscuit. Perfect with AIP cheese, delicious on its own or better still to accompany my chicken liver pate. You will need: A food processor Baking paper Ingredients: 1 cup of soaked and drained organic tigernuts - soak for 24 hours 1 cup of water 2 tablespoons of tigernut powder 1/3 cup of arrowroot powder A generous pinch of salt 2 sprigs of finely chopped fresh rosemary 1/2 cup of melted coconut oil 1 dessert spoon of powdered gelatin Method: Preheat oven to 180 degrees for fan assisted, 200 degrees for conventional. To make the oats, add the tigernuts to your food processor with half a cup of water and blitz on high speed until the tigernuts begin to break down. Add the rest of the water and pulse until you have an oat-like consistency. Transfer this mixture to a sieve and rinse the tigernuts making sure to drain off any excess water. Spread the oat mixture evenly across a lined oven tray and bake in the centre of the oven for 20 minutes, turning frequently to ensure they are baked evenly. Once the oats are a crisp golden brown, remove from the oven to cool. You will also need to remove any larger pieces of tigernut that remain. Transfer to a large mixing bowl. Add the tigernut powder, arrowroot, rosemary and salt to the oat mixture and combine thoroughly. Add the melted coconut oil to a seperate bowl and sprinkle the gelatin over the surface. Whisk immediately to ensure there are no clumps in the mixture. Pour the liquid into your dry mixture and mix thoroughly to combine. Line an oven tray with baking paper. Take a small handful of the mixture at a time - roughly the size of a golf ball and press into a biscuit shape on the paper. The biscuits may spread slightly when cooking so do not make them too thin to start with. Bake in the centre of the oven for 18 minutes or until turning golden brown. Remove from the oven to cool and firm up. These will keep well in an airtight container for up to 4 days. Enjoy! 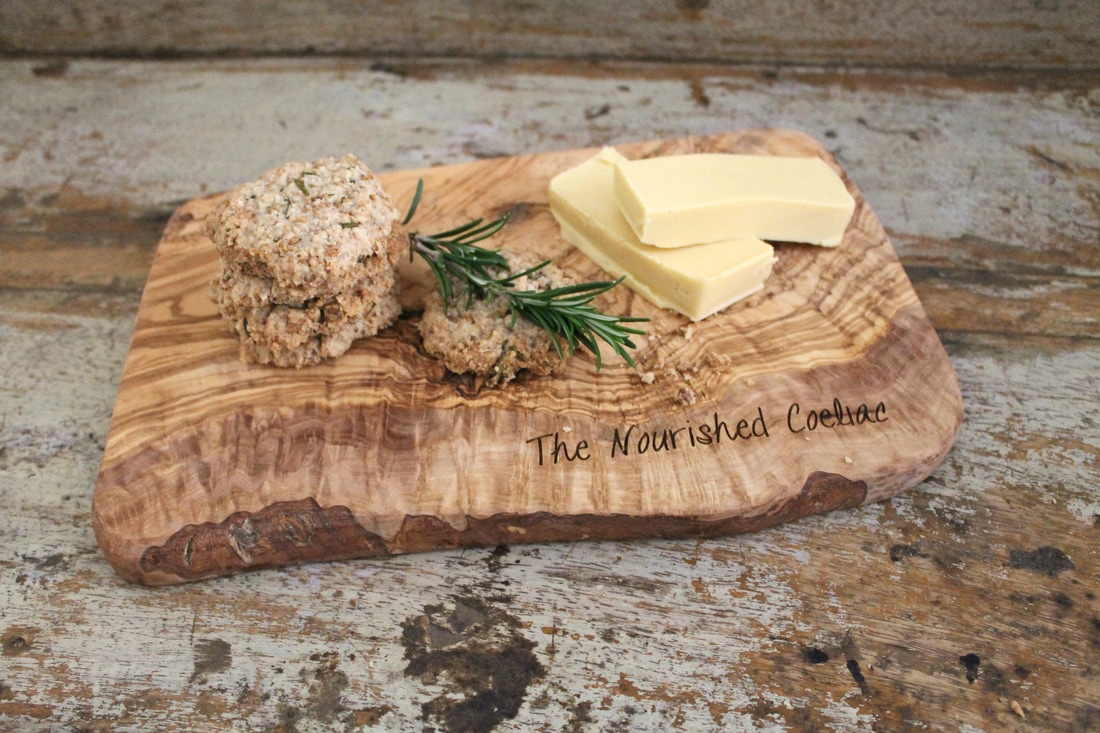 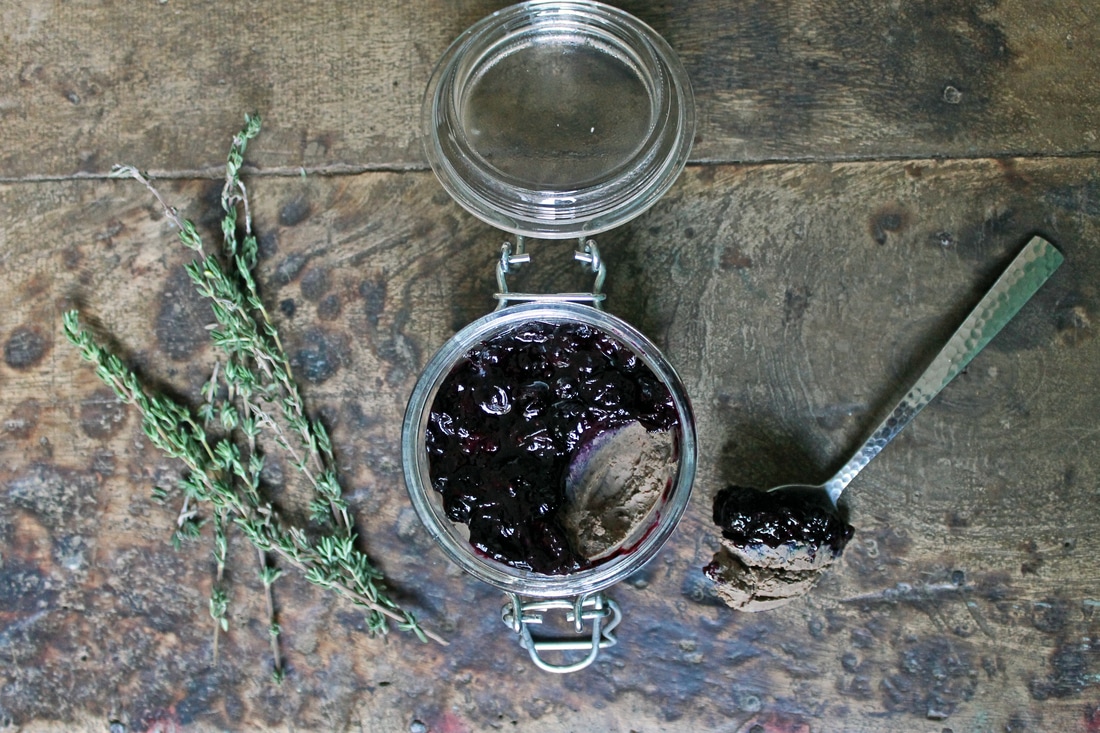 Chicken liver pate and blueberry jam (AIP, low FODMAP, Paleo, gluten free, dairy free)I luuuurve liver. I'm not even ashamed. Given that it is easily one of the most nutrient dense foods on the planet, I aim to incorporate it into my meal plan on a weekly basis. If you are following an AIP diet you will already be aware of the importance of consuming organ meat for its rich nutritional value, but this is one element of the diet where it can be easy to turn a blind eye. Understandably there's something about consuming organs that has the power to turn even the strongest stomach. As the self proclaimed most squeamish person on the planet (believe me - I cant even sit through an episode of casualty) If I can handle a packet of liver, anybody can. This is so super simple to make but absolutely packed to the rafters with scrumminess. Trust me - you won't even remember what it is you are eating but your body will thank you for it. Serves 2-4 You will need: A food processor Ingredients For the Pate: 400 grams organic chicken livers 1 generous tablespoon of coconut oil plus extra for frying 1 tablespoon of dried thyme A generous pinch of Himalayan salt For the Jam: 1 cup of fresh organic blueberries 1 tablespoon of water Generous pinch of ground ginger Method: To make the jam, add the blueberries, water and ginger to a medium saucepan and turn the heat to high. Bring to the boil and let this bubble for 4 minutes. As they soften, mash the blueberries down with a fork. Reduce the heat and cook on low for 7-10 minutes until the liquid is reduced and you have a thick jam. This will thicken further on standing. Reserve this to one side to cool completely. To make the pate, cook the livers in a little coconut oil over a medium/high heat. The livers should be nicely browned on the outside but still tender. Once cooked to your liking, transfer the liver to a food processor. Add the coconut oil, salt and dried thyme. Blitz the mixture on a high setting until it forms a smooth pate consistency. Transfer the pate to a sealed jar or ramekin dish and top with a generous layer of the blueberry jam. You can chill this in the refrigerator but I think it tastes best served immediately :) Enjoy 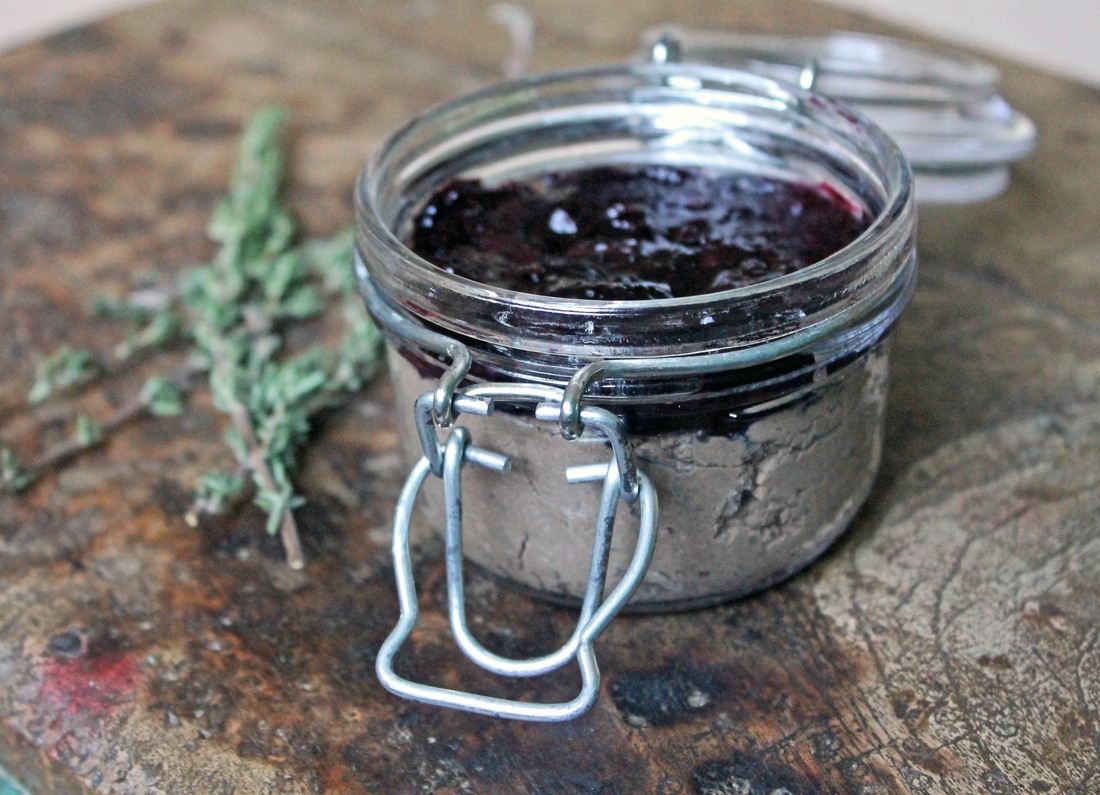 |

Emma CarterThis blog tells an ongoing story about me and my journey back to health and happiness. A boho soul always looking for my next European adventure. I am a Coeliac, Yogi, paleo advocate, dreamer, Bon jovi connoisseur, sun worshipper, snuggly jumper wearer and wife to my lovely Paulie. Archives
April 2017
Categories
All
|
 RSS Feed